OktoPush THREE by Isotonik Studios & PerforModule

A work in progress - Fully Featured Performance Template for the Ableton Push 3 Standalone

£25.00

INTRODUCTORY PRICE – We’ll be increasing the price with each new release, grab it now and join us on the journey!
This work in progress is to support the series of videos created as a result of healthy discussions with Peter Kirn of Create Digital Music exploring the use of MaxforLive with the Ableton Push 3 Standalone, what works, what doesn’t….It’s going to grow into a fully featured MaxforLive Performance Template for the Push 3 and Push 3 Standalone!
COMPATIBILITY: Ableton Live 11 / 12 Suite or Ableton Live 11 / 12 Standard with MaxforLive Installed
OS COMPATIBILITY: Mac & Windows
Min. Requirements: Ableton Live 11 Suite or Ableton Live 11 Standard with MaxforLive Installed – & A Push 3!
Ableton Live 12 Ableton Push 3 Standalone and MaxforLive
Play Video
album-art

    REVIEWS

    FEATURES

    CREATE DIGITAL MUSIC

    Reviews

    There are no reviews yet.

    Be the first to review “OktoPush THREE by Isotonik Studios & PerforModule”

    INSTALLATION:

    PLEASE NOTE: THIS INITIAL RELEASE IS PROVIDED INCLUDING A BASIC ABLETON LIVE SET THAT CONSISTS OF ALL THE DEVICES DESCRIBED

    Our Products are generally provided as Zip file downloads which in all cases will need to be extracted and saved to your hard drive prior to installation. Details on the different file type provided and what to do with them are below.

    .alp Files – These are Ableton Live Packs and will install directly into the Packs Section of the browser of Ableton Live. When you double click on them you will see a pop up window asking you to confirm that installation is ok as the files are described as “Legacy”. This is fine and you are ok to proceed, the packs are created using the format for an earlier version of Live and so remain compatible with the current version.

    .amxd files – These are individual MaxforLive Devices and can be stored anywhere on your hard drive. We’d advise creating a folder for them and then adding that folder as a location within the Places section of Lives Browser.

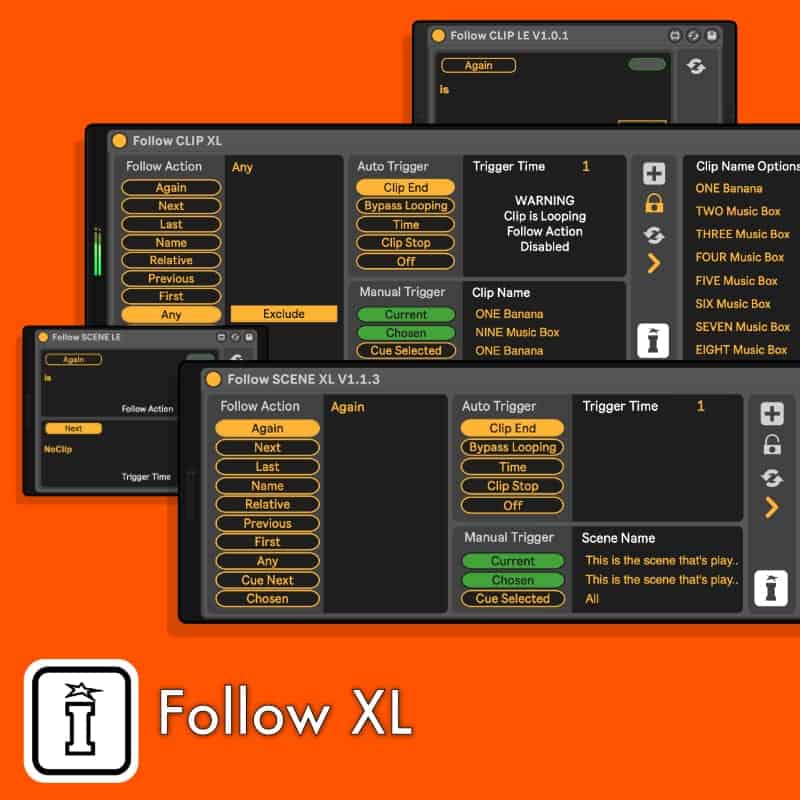
    Control Surface Scripts – Please refer to the individual User Guides provided with your download, an abridged version of the installation will be shown further down this page.

    ClyphX Pro – Please refer directly to the manual and installation video for this specific product.

    Novation Circuit Packs – These are provided as individual Sysex Files and as a complete bank file. All are to be installed using a version of the Circuit Editor and not via Novations Components back up utility.

    CHANGE LOG:

    V1.9 – Released February 4th 2024

    This release focuses mainly on controlling Macro Variations, allowing them to be configured and stored directly from the Push and morphing between them in a performance context.

    SCENE ONE

    • When changing between chains any currently in operation changes of values will stop, this allows for the setting of long release times without the changing value continuing when switching to a new effect
    • Made the reset value box smaller so as not to obstruct the dial display
    • Added Sigabort’s code for scanning Isotonik Racks at startup
      • This supports grabbing all of the rack ids, macro ID’s, so they don’t need to be constantly grabbed whilst performing increasing the performance response considerably
      • Gave the ability for the user to define the number of tracks, macro variations and chains to scan, this will be useful for people when performing with larger sets.
      • Names of nested parameters are recalled and displayed in the floating window
      • All macro Variation values are stored and recalled instantly allowing for seamless morphing between values
      • Holding down a Macro Button and recalling a Macro Variation will exclude that button from the recall
      • Added variations for the Beat Repeat Effect
      • When storing new variation the device will automatically scan for the new values allowing them to be used instantly.
      • Focusing on an Isotonik Rack, which will be greyed out by default as it is controlled by live.remotes to operate at an audio rate, and pressing the SELECT Button will release control allowing for the encoders to be used to dial in a new Macro Variation, you can then store your desired values by holding shift and a plan k Macro Variation Button. Press the SELECT Button once more to regain control of the Isotonik Rack
    • Completed the line up of PerforModule Racks (plus a few bonus ones to give added choice.

    PLEASE NOTE: The images in the manual will need updating, I wanted to get this out to you all before my vacation, I’m away from the Internet for the next few weeks so look forwards to being able to finish Scene ONE and film the promotional video when I return! 

    V1.8 – Released January 18th 2024

    V1.7 – Released Wednesday 3rd January 2024 – Happy New Year

    V1.6 – Released Wednesday 27th December – Alpha Testers Only

    V1.5 – Released Friday 22nd December 2023

    V1.4.0 – Released Black Friday 24th November 2023

    V1.3.0 – Released 18th November 2023

    Initial Release – V1.2.1 – 15th October 2023

    OktoPush THREE by Isotonik Studios & PerforModule

    The more I worked with MaxforLive and the Push 3 Standalone the more I realised I wanted to build a massive performance template for it!

    You can join in as I build OktoPush THREE in public by following the playlist produced in conjunction with Create Digital Music, the basic device will continue to be released for free and contain the theory behind the interactivity between the Push and Live. The concept being if you’re into programming yourself you can get hold of the code and build your own devices.

    Not everyone wants to do that though so OktoPush THREE is the alternative, a premium performance template that we’ll be building over a period of time, increasing the price with each new release. We’ll be adding new features via MaxforLive devices and including performance effect racks courtesy of effects wizard PerforModule!

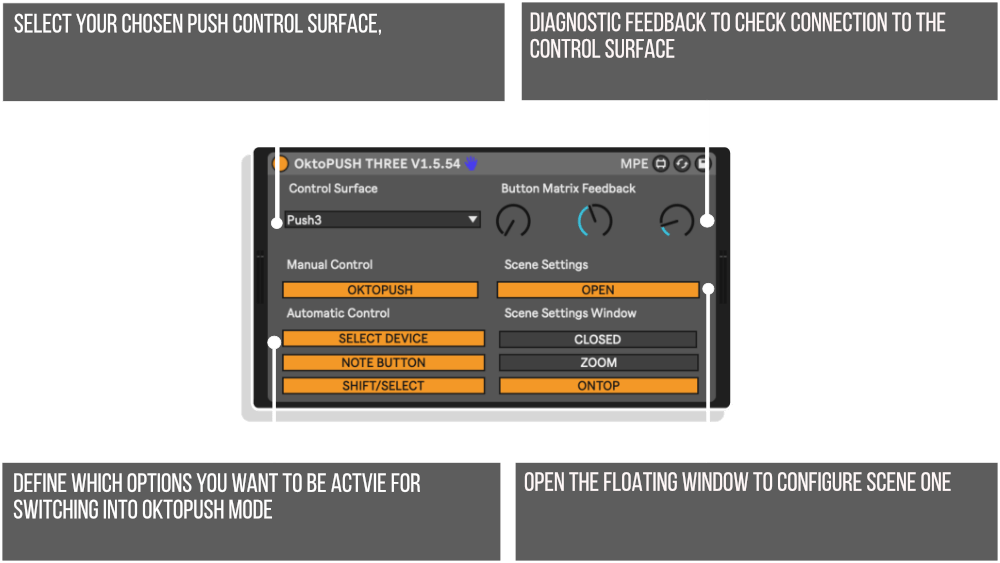
    Our intent is to use MaxforLive to create 8 separate modes of control to the Push 3 that you can switch between by pressing SHIFT and one of the SCENE LAUNCH BUTTONS.

    OKTOPUSH THREE – ACTIVATION & SELECTING SCENES

    Switching into OktoPush mode can be done with a variety of methods, as time progresses we may add or remove from these options based on users feedback, we may even make it a user definable option? We’ll take customers votes into account for this…

    1. Select the Track and then select the Push 3 Control Master Device, you’ll see the parameters on the screen will include a Grab/Release control assigned to an encoder for manual release prior to deleting the device.
    2. Select an Audio Track and press the NOTE MODE Button.
    3. Hold down the SHIFT Button and select a scene launch button that’s coloured orange, the button coloured green is the currently selected scene, pressing this whilst already in OktoPush mode will exit.
    4. Pressing SHIFT & SELECT will toggle in and out of OKTOPUSH Mode

    OKTOPUSH THREE – SCENE ONE

    FUNCTIONALITY

    SCENE ONE – CONFIGURATION

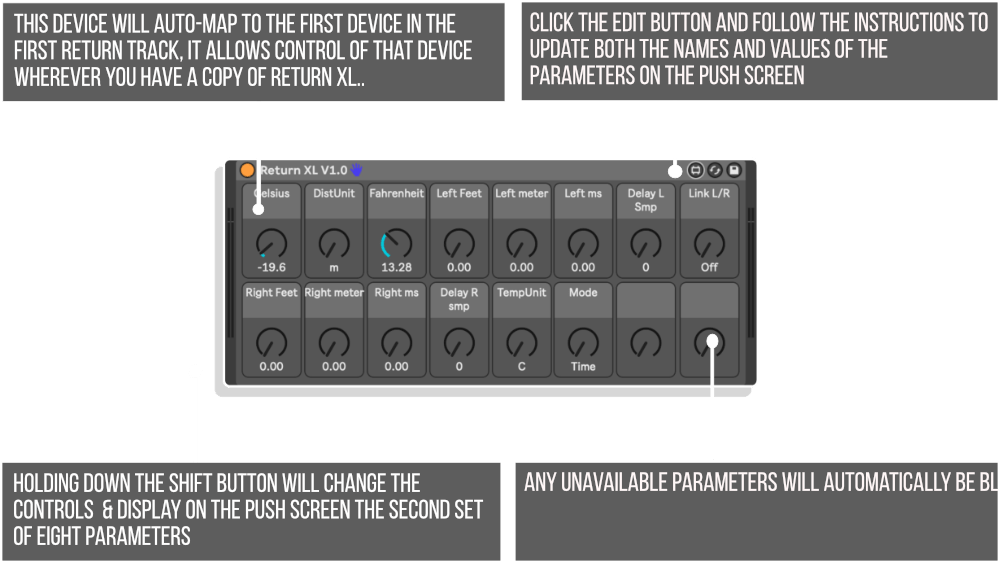
    Open the floating window from the OktoPUSH THREE device, if ZOOM is turned on you’ll be able to resize the window and have its contents scale to the chosen window size

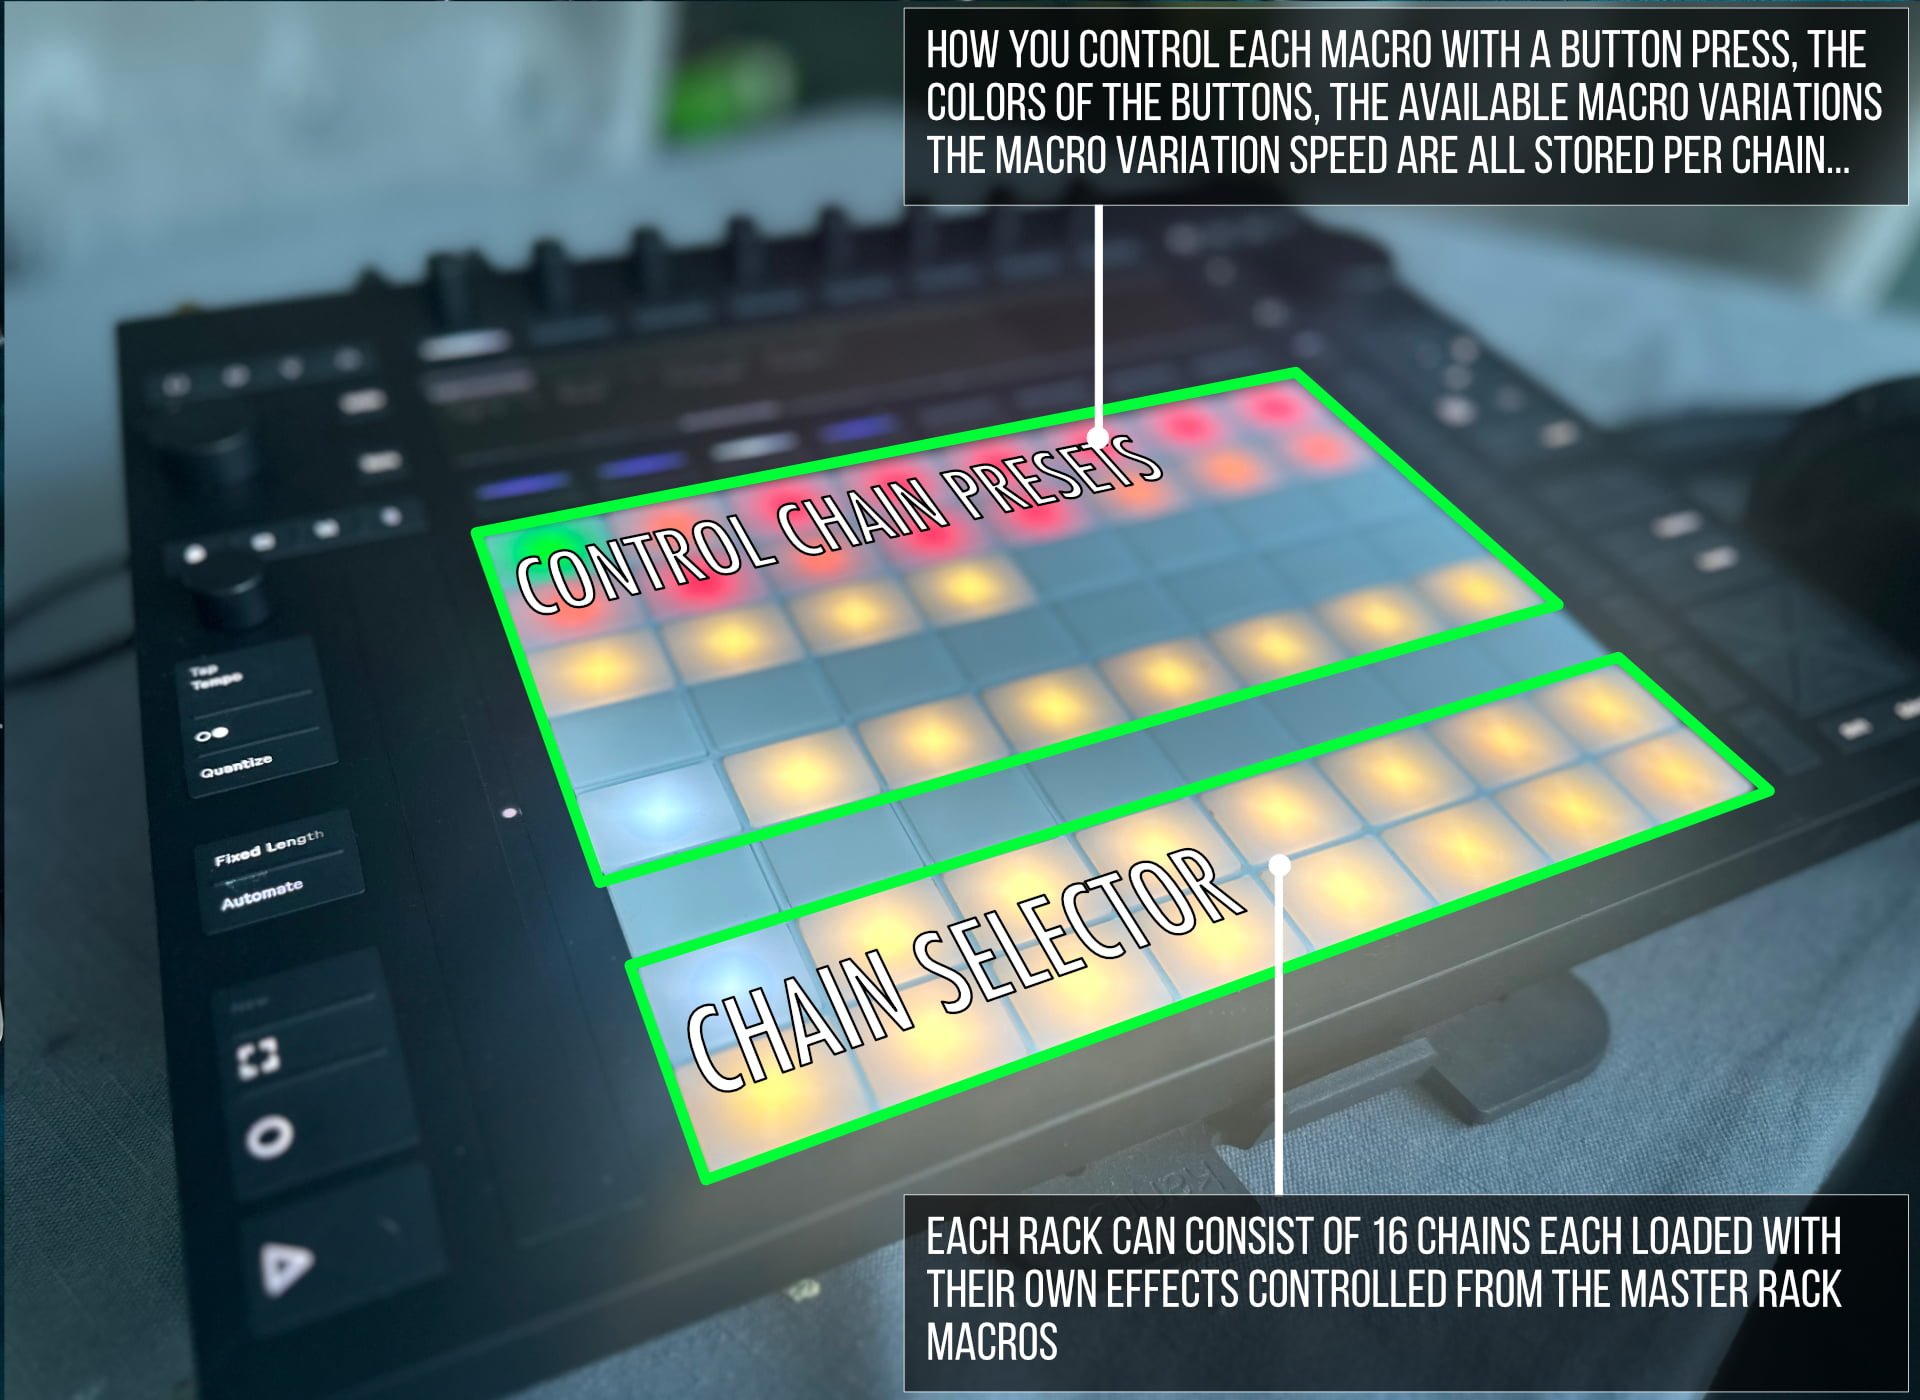
    For this release the mapping is fixed to be the second rack on each track, this means you can place an effect rack after a MIDI instrument and still control it using the Push. For an Audio track simply duplicate the provided template track.

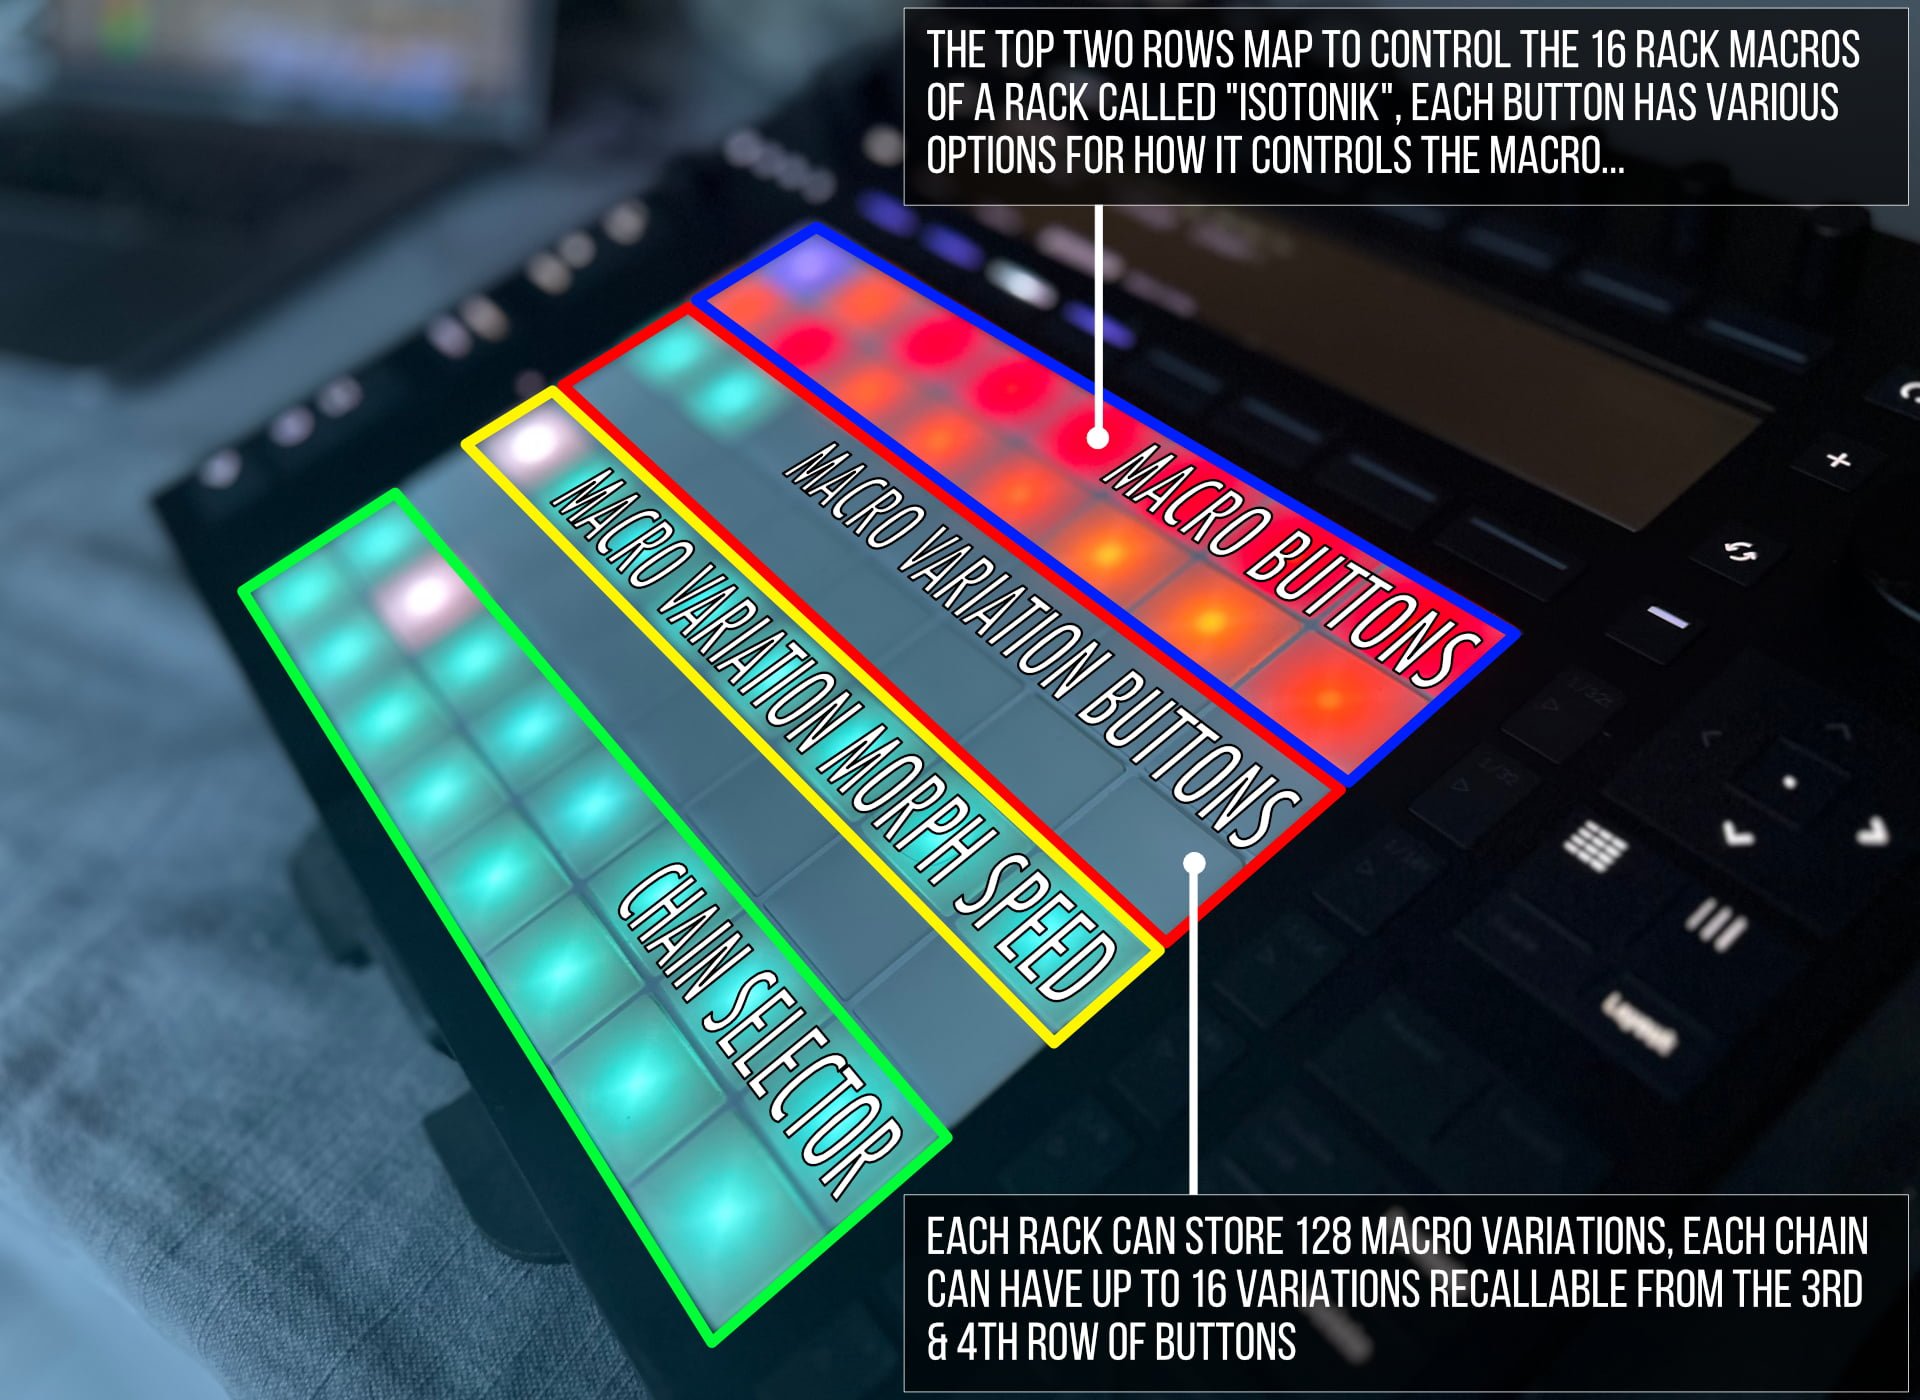
    Included within this release is the first set of effects courtesy of PerforModule, entitled the IsoModule series of racks each one is placed within it’s own chain of the Isotonik rack so that they can be switched between using the bottom tow rows of the Push.

    IsoMODULE FX

    These effect racks are not meant to be used the way most effect racks generally are, with controls turned smoothly from one value to another, and to leave there. Instead, they are meant for macros to jump to values instantaneously and temporarily.

    IsoModule FX series racks are designed to work with temporary finger presses on pads, affected by velocity sensitivity.

    A finger press on a pad triggers an effect macro. The resultant value above zero is a direct relation to the velocity of the initial press. When the finger is removed, the macro returns to zero.

    Use multiple fingers on pads simultaneously to modify effects in interesting ways!

    Each macro control corresponds to one of the top two rows of Push pads.

    Racks are set up with live performance using the first four fingers of each hand in mind. The left hand controls the leftmost two rows of four macros, while the right hand’s four fingers control the rightmost two rows of four macros. The “more important” parameters are attempted to be kept near the center, where the generally strongest and most dextrous index and middle fingers are handily lined up to press them.

    Some macros are designed to trigger effects immediately, and others are meant to modify the results of already-triggered macros. Experiment with different finger and pressure combinations for endless unique results!

    SCENE ONE – CONTROLS

    Each of the buttons can have its own set of behaviours configured, currently this is only possible from the floating window but when feature complete we’ll add the ability to configure these from the standalone as well.

    By first selecting a chain using the bottom two rows of the Push and then clicking the camera icon bottom right you can store the chosen options against a particular chain which will allow for control sets to be created individually based on the effects and how you want to control them.

    All of these control sets are saved within your live set but you can export them all, or individually. This is intended to make it possible for OktoPUSH users to be able to share racks and controls sets they’ve created via the Facebook User Group

    We’ve given some controls for button colour feedback for the available and chosen Macro Variations, Macro Morph Speed and the Chains. We may make these colours linked to the currently chosen chain in a future release, your feedback is welcome on this! 

    SCENE ONE – CONFIGURATION

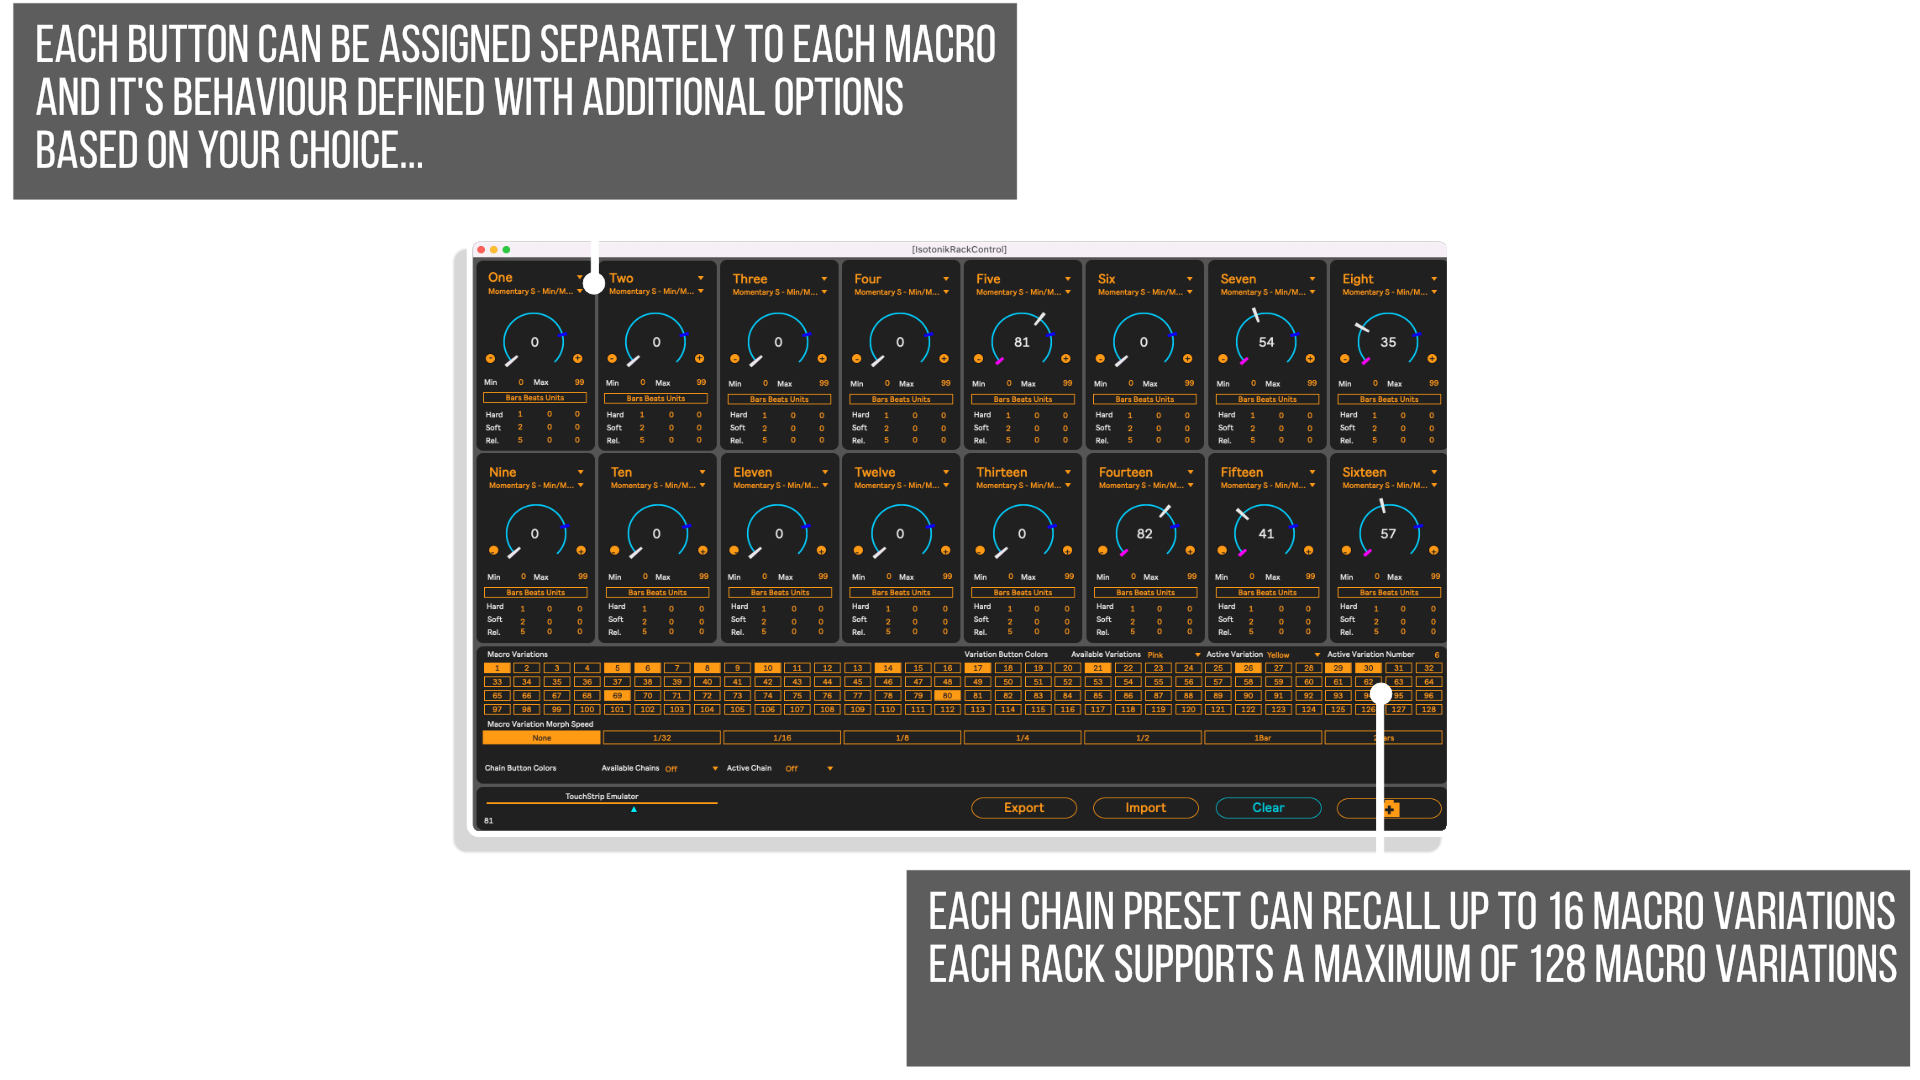
    Macro Number – You can assign a button to a specific macro within the Isotonik Rack, this allows you to have multiple buttons focused on the same macro if you wish to have different ways of interacting with the macro or indeed have a number of buttons sending a different value to create a group of buttons using the SINGLE behaviour option.

    Behaviour – There are fourteen different options for choosing how a Macro behaves when a button is pressed and released on the Push. Each option currently has a set of button color feedbacks detailed below

    1. Toggle – Min / Max – When pressed the Macro will toggle between the chosen Min and Max values – Colours Min = Red Max = Green (shades of Orange if the macro value is neither of these values)
    2. Toggle S – Min / Max – As above but this time the Macro will morph between the current value and the Min / Max Values based on how hard the button was pressed, you have separate options for the speed of how quickly this morph happens which can be set in milliseconds or bar’s beats and units (recalculates whenever the project tempo is changed) – Colours Min = Red Max = Green (shades of Orange if the macro value is neither of these values)
    3. Toggle Velocity – With no Min and Max values this will toggle the Macro between off and on with the On value being dictated by how hard you press the button – Colours Min = Dark Grey / Max = White with shades of white in-between.
    4. Momentary – Min / Max – Press the button to move the macro to the Max Value, release to return to the Min Value – Colours Min = Dark Grey / Max = White with shades of white in-betwee
    5. Momentary S – Min / Max – As with the Toggle S option the time taken to move between the current macro value and the Max value is dictated by the pressure of how hard you press with options to define both the upper and lower ranges of this time in either Milliseconds or Bars Beats and Units. As a release of a button is zero in pressure you have an additional configuration option of the release time. Colours Min = Dark Grey / Max = White with shades of white in-betwee
    6. Momentary V – Velocity – Pressing and releasing will observe the pressure to dictate the value the macro rises to, this is an instant on and off option. Colours Min = Dark Grey / Max = White with shades of white in-betwee
    7. Single – Use this option if you only ever want the button press to set the macro to a certain value. Combine this with other buttons that are focused on the same macro to create a radio button effect that gives visual feedback across multiple buttons of the current value. Colours Chosen Value = Light Blue Not Chosen Value – Dark Yellow
    8. Single V – Velocity/Speed – As with the above the press of this option will only ever reach the chosen value, with this option though the velocity is used to calculate the time it takes to reach the desired value observing the Soft and Hard time values in either milliseconds or Bars Beats and Units.
    9. Single T – Set time to reach value — The same singular value can be achieved by using this option, the Time value dialled in will always be used to calculate how long it takes to reach the chosen value.
    10. Toggle T – Min / Max – Set Time – Each press will toggle between the chosen Minimum and Maximum values, the speed at which the macro morphs between the two values is fixed in Milliseconds or Bars, Beat, & Units which remains synced to the transports tempo.
    11. Toggle V T – Velocity is reached at set time – Simply put the Velocity of your press is the value that you’ll toggle to at the set Time dialled in via the time options.
    12. Momentary T – Min/Max – Set time to reach value – When pressed the max value will be reached at the set time, when released the opposite happens
    13. Momentary V T – Velocity 0-127 – Set Time to reach Value – The velocity of how hard you press is observed and used to calculate the Macro Value to be reached at a set time. When released a separate time control is used for how long it takes to return to zero.
    14. Momentary V V – Velocity is used for both the value reached on the Macro and the time it takes to get there, a separate time control is given for when you release the button and the value returns to zero.

    MACRO VARIATIONS

    OktoPUSH supports the recall of up to 16 Macro Variations per chain and a total of 128 Macro Variations, whilst the Isotonik Rack has 128 Macro Variations visible these are currently for testing purposes.

    After selecting a chain using the bottom two rows you can select any of the 128 Macro Variations to be associated with the chain, save them using the camera icon at the bottom right and when switching between chains you’ll see the button colours change to indicate the number of variations available per chain, pressing one of the buttons in rows three and four will ultimately recall the saved macro variation observing the morph speed and light the button accordingly.

    You can save a macro variation to be associated with multiple chains.

    OKTOPUSH THREE – SCENE TWO – EIGHT – IN DEVELOPMENT

    Check the change log to see which features have been added to see the progress.

    PLEASE NOTE: THIS TEMPLATE HAS BEEN TESTED TO WORK WITH THE PUSH 3 STANDALONE & CONTROLLER. WE HOPE TO EXTEND THE TESTING TO PUSH ONE & TWO FOR FUTURE RELEASES

    More Products from.... Isotonik Studios...!

    MORE ISOTONIK STUDIOS PRODUCTS – CLICK HERE

    Smart XL by Isotonik Studios

    Advanced Live Parameter Control
    Min. Requirements: Ableton Live 10 Suite or Ableton Live 10 Standard with MaxforLive Installed

    Modular Series XL by Isotonik Studios

    Follow XL, Smart XL, Looper XL, Isotonik FXL
    Min. Requirements: Ableton Live 10 Suite or Ableton Live 10 Standard with MaxforLive Installed

    Follow SCENE & CLIP XL by Isotonik Studios

    If you work with a band or in a Worship context then Ableton Live can be awesome to play your backing tracks, with the MaxforLive device, Follow Scene you can trigger the next scene automatically and decide on the fly whether to repeat it again.
    Min. Requirements: Ableton Live 10 Suite or Ableton Live 10 Standard with MaxforLive Installed

    LaunchSync XL by Isotonik Studios

    LaunchSync allows you to tie Control Surfaces together to create a giant Session Controller, it additionally adds dynamic mapping of parameters across multiple tracks for channel strip style control.
    Min. Requirements: Ableton Live 10 Suite or Ableton Live 10 Standard with MaxforLive Installed

    If you fill in the form below we'll do our best to get back to you in a timely manner!

    Contact Form Demo (#3) (#4)

    IF YOU ARE CURRENTLY STUDYING OR TEACHING IN THE FIELD OF MUSIC AT A HIGHER EDUCATION INSTITUTION, PLEASE COMPLETE THE FORM BELOW TO REQUEST YOUR DISCOUNT CODE VIA EMAIL

     Please enter a valid student or teacher email to be used for your purchases with the same URL as the website of the institution below

    As an existing customer please log into your account with the link below, you'll find our knowledge base which may answer your question and the option to submit a support ticket...

    MY ACCOUNT - SUPPORT

    Special Offer

    10% DISCOUNT

    on your first order When you Sign up to our Mailing List*

    *Not applicable to products on sale, cannot be combined with any other offers