SONG:LOOPER:MODE is a Control Surface Script for Ableton Live 10 that lets you use your Push or supported LaunchPad in a different way, and makes it possible to have your whole set on a single page. It also provides a convenient way to use your Arrangement Markers and Looper devices.
To activate SONG:LOOPER:MODE:
- on the Launchpad Mini MK3, press the User button
- on the Launchpad MK2, press the User 2 button
- on the Launchpad X, press the Custom button
- on the Push ONE & TWO,, press the User button
On the LaunchPads the button will then turn Yellow. To switch back to the original User/Custom mode, press the button once again (it will be back to its normal color).
SONG:LOOPER:MODE has 3 views. One is dedicated to the Arrangement view, one for Session view,and one for the Looper view.
- In Arrangement view, the pads will correspond to Markers
- in Session view, they will correspond to Scenes.
- in Looper view, they will correspond to Loopers devices.
PUSH ONE & TWO
To select Arrangement view, press the Note button, to select Session mode, press the Session button.
For the Session and Arrangement views, there are 2 possible layouts : a “Simple” and an “Advanced” one.
- The Simple layout reflects the Scenes or Markers in a straightforward manner : 1 pad = 1 Scene/Marker.
- The Advanced layout allows you to group several Scenes or Marker within a “Song”.
To toggle between layouts, press the Layout button (Select Button on Push 1).
LAUNCHPADS
To toggle between the 2 views, press the Session/Arr Toggle button. In Session mode, it will be Purple,and in Arrangement mode it will be Pink.
The Session/Arr Toggle button also changes the active Session / Arrangement view in Live.
For the Session and Arrangement views, there are 2 possible layouts : a “Simple” and an “Advanced” one.
- The Simple layout reflects the Scenes or Markers in a straightforward manner : 1 pad = 1 Scene/Marker.
- The Advanced layout allows you to group several Scenes or Marker within a “Song”.
SONG:MODE
SONG:MODE is so simple and effective it should become the mainstay of your Live performance. As your Live set naturally grows the navigation around it and keeping track of your songs starts to become a challenge of a multitude of button presses to locate and trigger your next song. With SONG:MODE your next song is literally one button press away.
With the launch of SONG:MODE V2 we’ve extended the usage of the script in two ways, first up the new functionality working in both SESSION and ARRANGEMENT views, secondly for each view there are two separate working modes, SIMPLE & ADVANCED:
- The “Simple” layout is very straightforward, with 1 Pad = 1 Scene or Marker, and works straight out of the box.
- The “Advanced” layout allows you to group Scenes or Markers into “Songs”, as this was already the case on SONG:MODE 1.0.
- Other new features:
- Toggle between Arrangement and Session views from the controller
- Set a Loop in Arrangement by holding several pads, toggle the Loop from the controller
- Add colors to Markers, Scenes or Songs directly from the controller
- “Safe/Restart” function to always launch playback from the last position or in case of accident
- When adding (STOP) to a Marker or Scene’s name, Live will stop
- Stop All Clips / Back to Arrangement button
- Arrangement Record (Only for Push 1 & 2 and Launchpad X)
- Improved the way SONG:MODE is activated on Launchpad Mini MK3 and Launchpad X
SET UP – LAUNCHPAD
Select the Song Mode LaunchPad script applicable to your controller in the Control Surface section of Lives preferences and assign the LaunchPad to its input and output. Then to activate SONG:MODE you simply press the User/Custom button.
SET UP – PUSH ONE & TWO
Select the Song Mode Push script applicable to your controller in the Control Surface section of Lives preferences and assign the Push User Ports to its input and output. Then to activate SONG:MODE you simply press the User button.
SIMPLE LAYOUT
All the Scenes and Markers are accessible directly from the Controller, and they are automatically detected.
In Arrangement view, you can add Markers by pressing the New button, and set a Loop by holding the Marker’s pads.
You can assign colors to pads (both for Markers and Scenes) directly from the controller.
ADVANCED LAYOUT
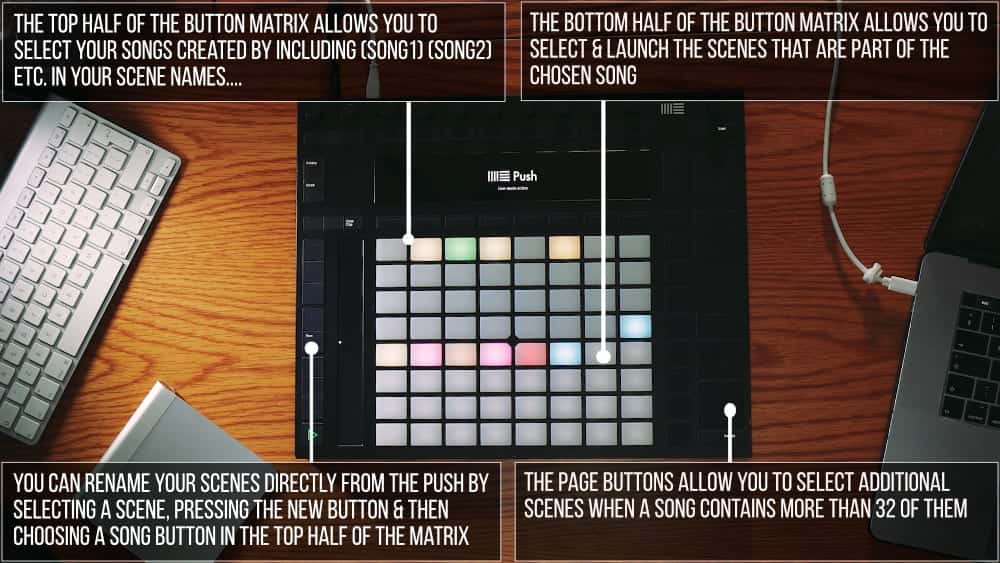
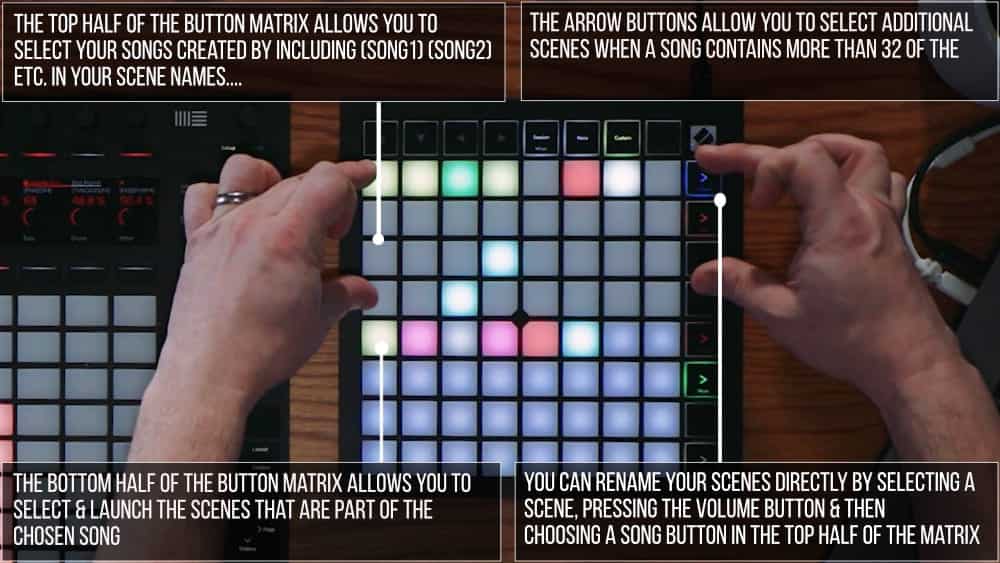
Advanced layout allows you to group several Scenes or Markers into virtual “SONGS”.
Once set up, the top half of the pad matrix of your LaunchPad lets you select a SONG, and then the bottom half will display and launch the Scenes that belong to this SONG. The selected SONG will blink, the playing SONG and Scene will blink in Green.
To add a Scene to a specific SONG, you just need to add (SONG#) somewhere in the name of the Scene or Marker, where # is the song number. Eg. (SONG1), (SONG2),…
There are 3 ways to do that :
- You can directly rename the Scene / MarkerYou can select the Scene in Live, then hold the top right scene launch button and press the target SONG’s pad
- You can use the Max For Live device (see below)
- The pads take the Scene’s color; the first Scene or Locator will give its color to the SONG’s pad. You can change the colors from the controller itself.
The other Modes of the LaunchPad are still available, simply press any other Mode button to exit SONG:MODE* on the LaunchPad or the User Button once more on the Push
Other buttons :
If your Ableton Live set contains more than 32 Songs, the upper Up/Down arrows will let you navigate through the list, and if one Song contains more than 32 Scenes or Locators, you can scroll through it by using the upper Left/Right arrows.
- If you hold the third Scene Launch button and press a Scene pad, the (SONG#) tag will be removed from its name, and thus, the Scene will be removed from the corresponding SONG.
- The fourth Scene Launch button toggles the Arrangement Loop button
- The fifth Scene Launch button activates the “Stop All Clips” button, pressing it while holding Shift will activate “Back To Arrangement”
- The sixth Scene Launch button starts and stops Live’s playback.
- The seventh Scene Launch button (“Safe/Restart”) launches playback from the last start position
LOOPER:MODE
Have you ever been fighting with Live’s Looper and its lack of visual feedback?
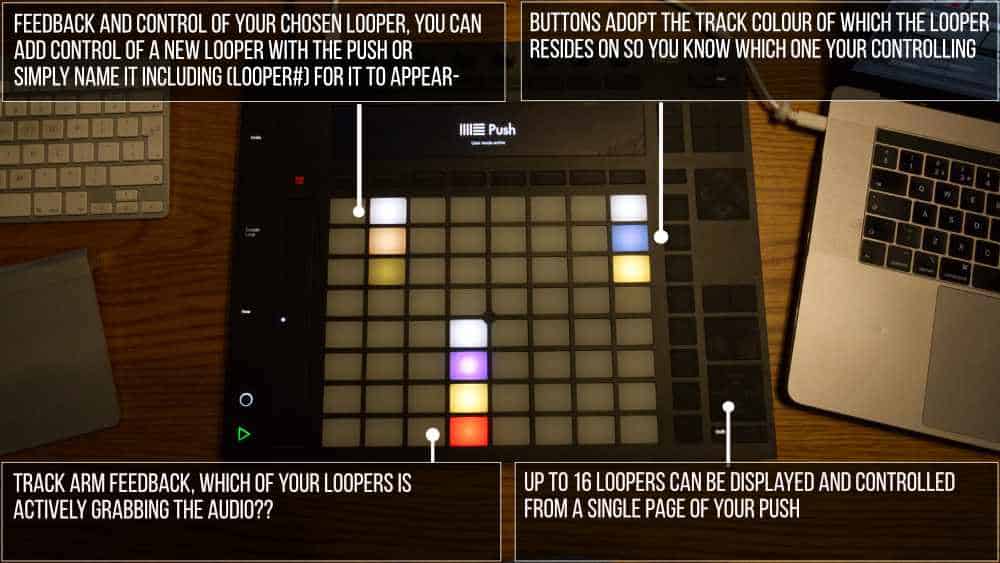
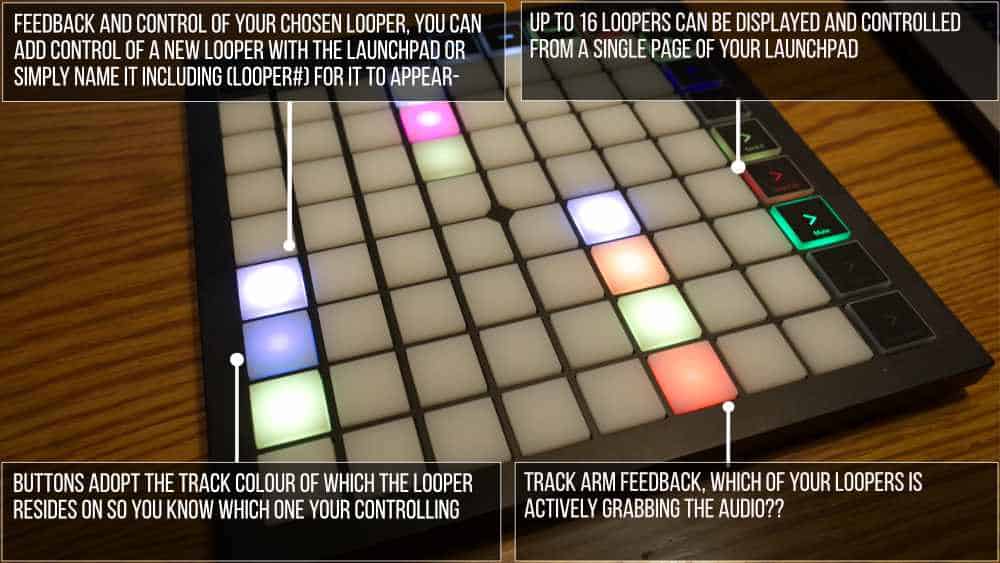
Then LOOPER:MODE is here for you. On a single page of your favorite controller, LOOPER:MODE allows you to monitor and control up to 16 Looper devices simultaneously at the push of a button.
All you need to do is select a Looper in Live, press the “New” button of the Push or supported LaunchPad when in User Mode, and the Looper will instantly be added to the pads matrix and show 4 buttons.
The top button will reflect the state of the Looper, and will let you change it.
The 2nd button will show the color of the track on which the Looper is, and pressing will take you instantly to the Looper device.
The third button will act as a Mute button for the track and the fourth button is for the Arm button.
Of course, you can still map the Looper to your favorite pedal or use the Multi-Purpose button, and all the settings will be recalled when opening an existing set.


Reviews
There are no reviews yet.