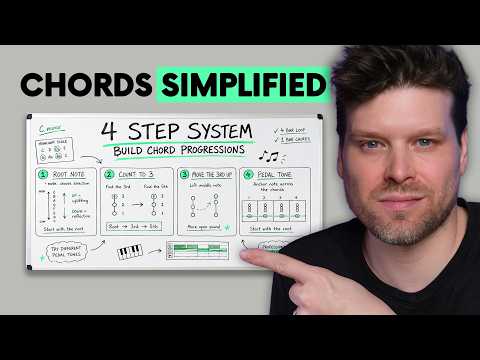
Craig from Push Patterns breaks down a simple four-step system for building professional-sounding chord progressions in Ableton Live — no music theory required.
If your tracks keep stalling the moment you need to add chords, this walkthrough is exactly what you need. Craig from Push Patterns teaches a repeatable four-step system for building full chord progressions inside Ableton Live’s piano roll — using nothing more than scale awareness and the ability to count to three.
What It Does
Ableton Live’s built-in scale awareness tool does the heavy lifting. By setting your key and activating scale mode, the piano roll hides every out-of-key note so that anything you click will sound correct. That single step removes the most common reason producers freeze at a blank MIDI clip.
From there, the system works by stacking notes in a specific pattern — root, third, fifth — and then reshaping those chords using an octave shift and a pedal tone to give the progression movement and a professional, open quality. The result sounds like a keys player wrote it rather than someone guessing at random notes.
The approach works across electronic genres where minor keys tend to generate more evocative, emotionally charged progressions than major, and it scales up as your confidence grows.
How to Use It
- Set up scale awareness: Select your key in Ableton Live’s scale toolbar at the top of the arrangement view, then enable Highlight Scale in the piano roll to show only in-key notes.
- Configure your MIDI clip: Create a four-bar MIDI clip and set the note input grid to one bar so each chord you draw in fills a full bar automatically.
- Step 1 — Find a root note: Place a single note to start each chord. Moving root notes downward creates a reflective, melancholic feel; moving upward gives a more uplifting character.
- Step 2 — Count up to the third: From each root note, skip one scale step and place a second note. That gap of one step is the third, and it defines the emotional flavour of the chord.
- Step 3 — Count up to the fifth: From the third, skip one more scale step and place a third note. You now have a complete triad for each chord in the progression.
- Step 4 — Raise the middle note an octave: Select all the middle (third) notes using Shift and click, then press Shift and the up arrow key to move them up one octave. This spreads the chord out and gives it an open, professional quality.
- Add a pedal tone: Place a sustained note — starting with the root in a higher octave — that runs through all four chords. If it clashes on a particular chord, nudge it up or down one scale step using the arrow keys until it sits comfortably.
- Balance with the beat: Bring your drum track back in and use the track fader to balance the chord volume against the percussion until both elements sit together naturally.
Why It Matters
Most producers who struggle with chords are not lacking musical ability — they are lacking a repeatable process. This four-step framework gives you a consistent starting point for every session so a blank piano roll stops being a barrier and becomes a prompt. The system works in any key, suits minor-leaning electronic genres particularly well, and produces results that hold up against a full arrangement rather than falling apart the moment a beat enters the mix.