£22.00

Our Products are generally provided as Zip file downloads which in all cases will need to be extracted and saved to your hard drive prior to installation. Details on the different file type provided and what to do with them are below.
.alp Files – These are Ableton Live Packs and will install directly into the Packs Section of the browser of Ableton Live. When you double click on them you will see a pop up window asking you to confirm that installation is ok as the files are described as “Legacy”. This is fine and you are ok to proceed, the packs are created using the format for an earlier version of Live and so remain compatible with the current version.
.amxd files – These are individual MaxforLive Devices and can be stored anywhere on your hard drive. We’d advise creating a folder for them and then adding that folder as a location within the Places section of Lives Browser.
Control Surface Scripts – Please refer to the individual User Guides provided with your download, an abridged version of the installation will be shown further down this page.
ClyphX Pro – Please refer directly to the manual and installation video for this specific product.
Novation Circuit Packs – These are provided as individual Sysex Files and as a complete bank file. All are to be installed using a version of the Circuit Editor and not via Novations Components back up utility.
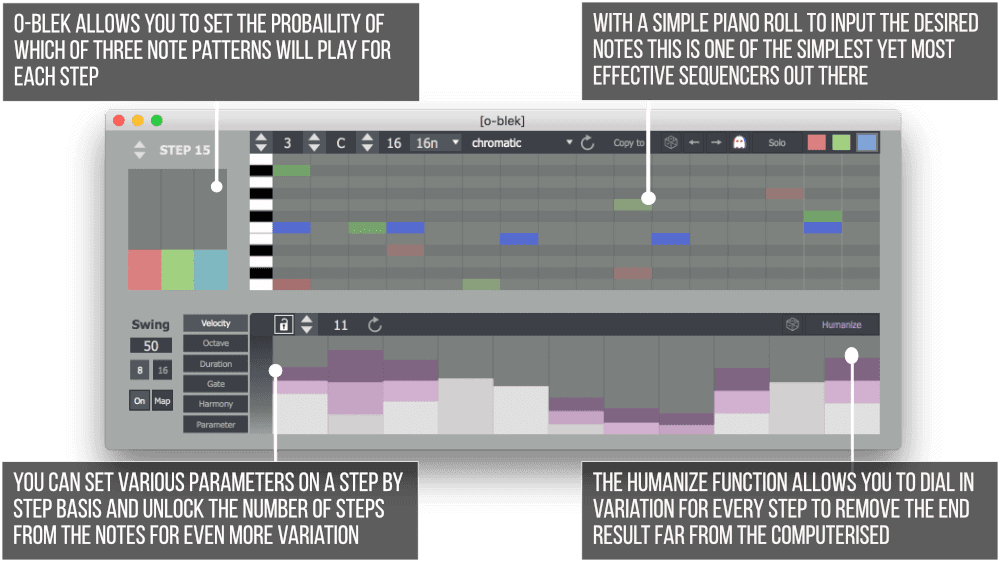
O-blek is a stochastic sequencer with individual length options to offset and produce dynamic ever- changing patterns easily. By setting the probability at each step of which of 3 sequences are played from, combined with separate sequence lengths for velocity, octave shift, note length, gate, harmony and 2 set parameters the result is controlled chaos. Easily set parts of the sequence to be fixed, and other parts directed by probability.
The piano roll works much like the one in Ableton, you simply click the mouse to add or remove notes. This is essentially a mono sequencer so only one note can be placed in each step, although there are other ways to create harmony shown later. If a scale is set, as above, then the piano roll will display the octaves with a darker gray colour. If you hold shift and click any step, this will not change the note, but will select the step in the probability section to the left. Also, the note value will display to the bottom right of the piano roll for wherever the mouse is hovering.
This section is essentially a Markov node to set the probability of which sequence will be played at each step. The step can be selected at the top, or by holding shift and clicking the desired step in the piano roll. The sliders represent what % of probability each sequencer has of playing, so as you change one, the others will also change to reflect the true probability in proportion to the other sliders. This allows for a clear visual indicator of real probability values.
Here there are sequencers for 6 elements other than the note value set in the piano roll. Select which element to edit by clicking the tab on the left. The value for any element is displayed to the bottom right of the sequencer.
Each sequencer is by default locked to the piano roll. This means it has the same number of steps and will also play in the same direction as set for the piano roll. If this is unlocked then the sequence can have a different number of steps and its own individual direction of play.
VELOCITY – The light gray bars show the velocity level for each step. If the humanize button is clicked then you can also change the randomization amount relative to the set velocity level, shown with a purple rectangle. You can also change this by holding shift and using the mouse. This way you can have subtle variations or completely different velocity levels each time.
OCTAVE – The octave shift can be set +/- 3 octaves from the note set in the piano roll.
DURATION – The note length for each step can be set here separately from the piano roll. The values are from 1/8 of a step to 4 steps. This will allow further degrees of variation in your sequences.
GATE – The gate sets whether that step in the sequence will play at all, so is either open or closed. Like all the other elements, the sequence length and play direction can be set individually for more variation.
HARMONY – Two extra notes can be triggered to create chords, here you can see one note in green and the other pink. The values are set in semitones relative to the original note for that step, up to +12. By dealing with polyphony in this way, the extra notes can again be offset in sequence length from the original piano roll.
PARAMETER – This section allows you to sequence 2 parameters which you can assign to anything mappable in Live. Click on either One or Two, then click the Map button that appears on the left, then click any parameter in Live. The parameter value changes are set with smoothing relative to the step size, so the value changes will always be smooth from one step to the next. On the left the parameter can also be turned on and off.
SWING – You can set a groove amount to all the sequencing, and the timing to either 8th note or 16th.
3 reviews for O-blek by LDM Design
Jamie –
Great for getting the creative juices flowing. One of the most interesting probability generators I’ve worked with.
daizok –
Intuitive and versatile probability sequencer with a friendly interface, recommended.
Leonardo Linsky –
Absolutely love this device especially when paired with the chance packs! Looking forward to more releases! So much inspiration. Thanks!